Front panel
Finally, it is time to give OpenWordClock its face. Within this project, two different styles of front panel are discussed. However, there are more techniques, that can equally be used to create a suitable front panel.
Front panel layout
There are some considerations to take into account, when designing the front panel. Obviously, the desired language changes the front panel design (and the software programming). But even within one language, there are certain peculiarities.
Taking the german language as an example, think about how a time is said in the spoken language. In German, to tell the time (accurate to 5 minutes), one first tells the 5-minute-mark, followed by a preposition (before, after) and then the hour. All that is preceded by “Es ist” (i.e. it is) and followed by “Uhr”. We thus can construct any time to tell by following through the following list.
“Es ist” - always preceeds the time to tell.
The 5-minute mark. Select the most suitable from
“fünf”
“zehn”
“viertel”
“zwanzig”
The correct preposition
“nach”
“vor”
If applicable, the half hour - “halb”
Finally, the hour - “eins” … “zwölf”
We want to have these building block represented in the front panel and that in the right order. “Es ist” needs to go on the top, “Uhr” goes at the end. The 5-minute-mark needs to go before the hour.
In some german dialects, there is the weird way to tell the time in quarters of the hour, resulting in (admittedly, even for a german strangely weirds sounding) phrases like “Es ist dreiviertel vier” (“It is threequarters four”, 15:45). To accommodate this variation as well, we also want to prepend “viertel” with “drei”, allowing us to light up the right LEDs use either dialect.
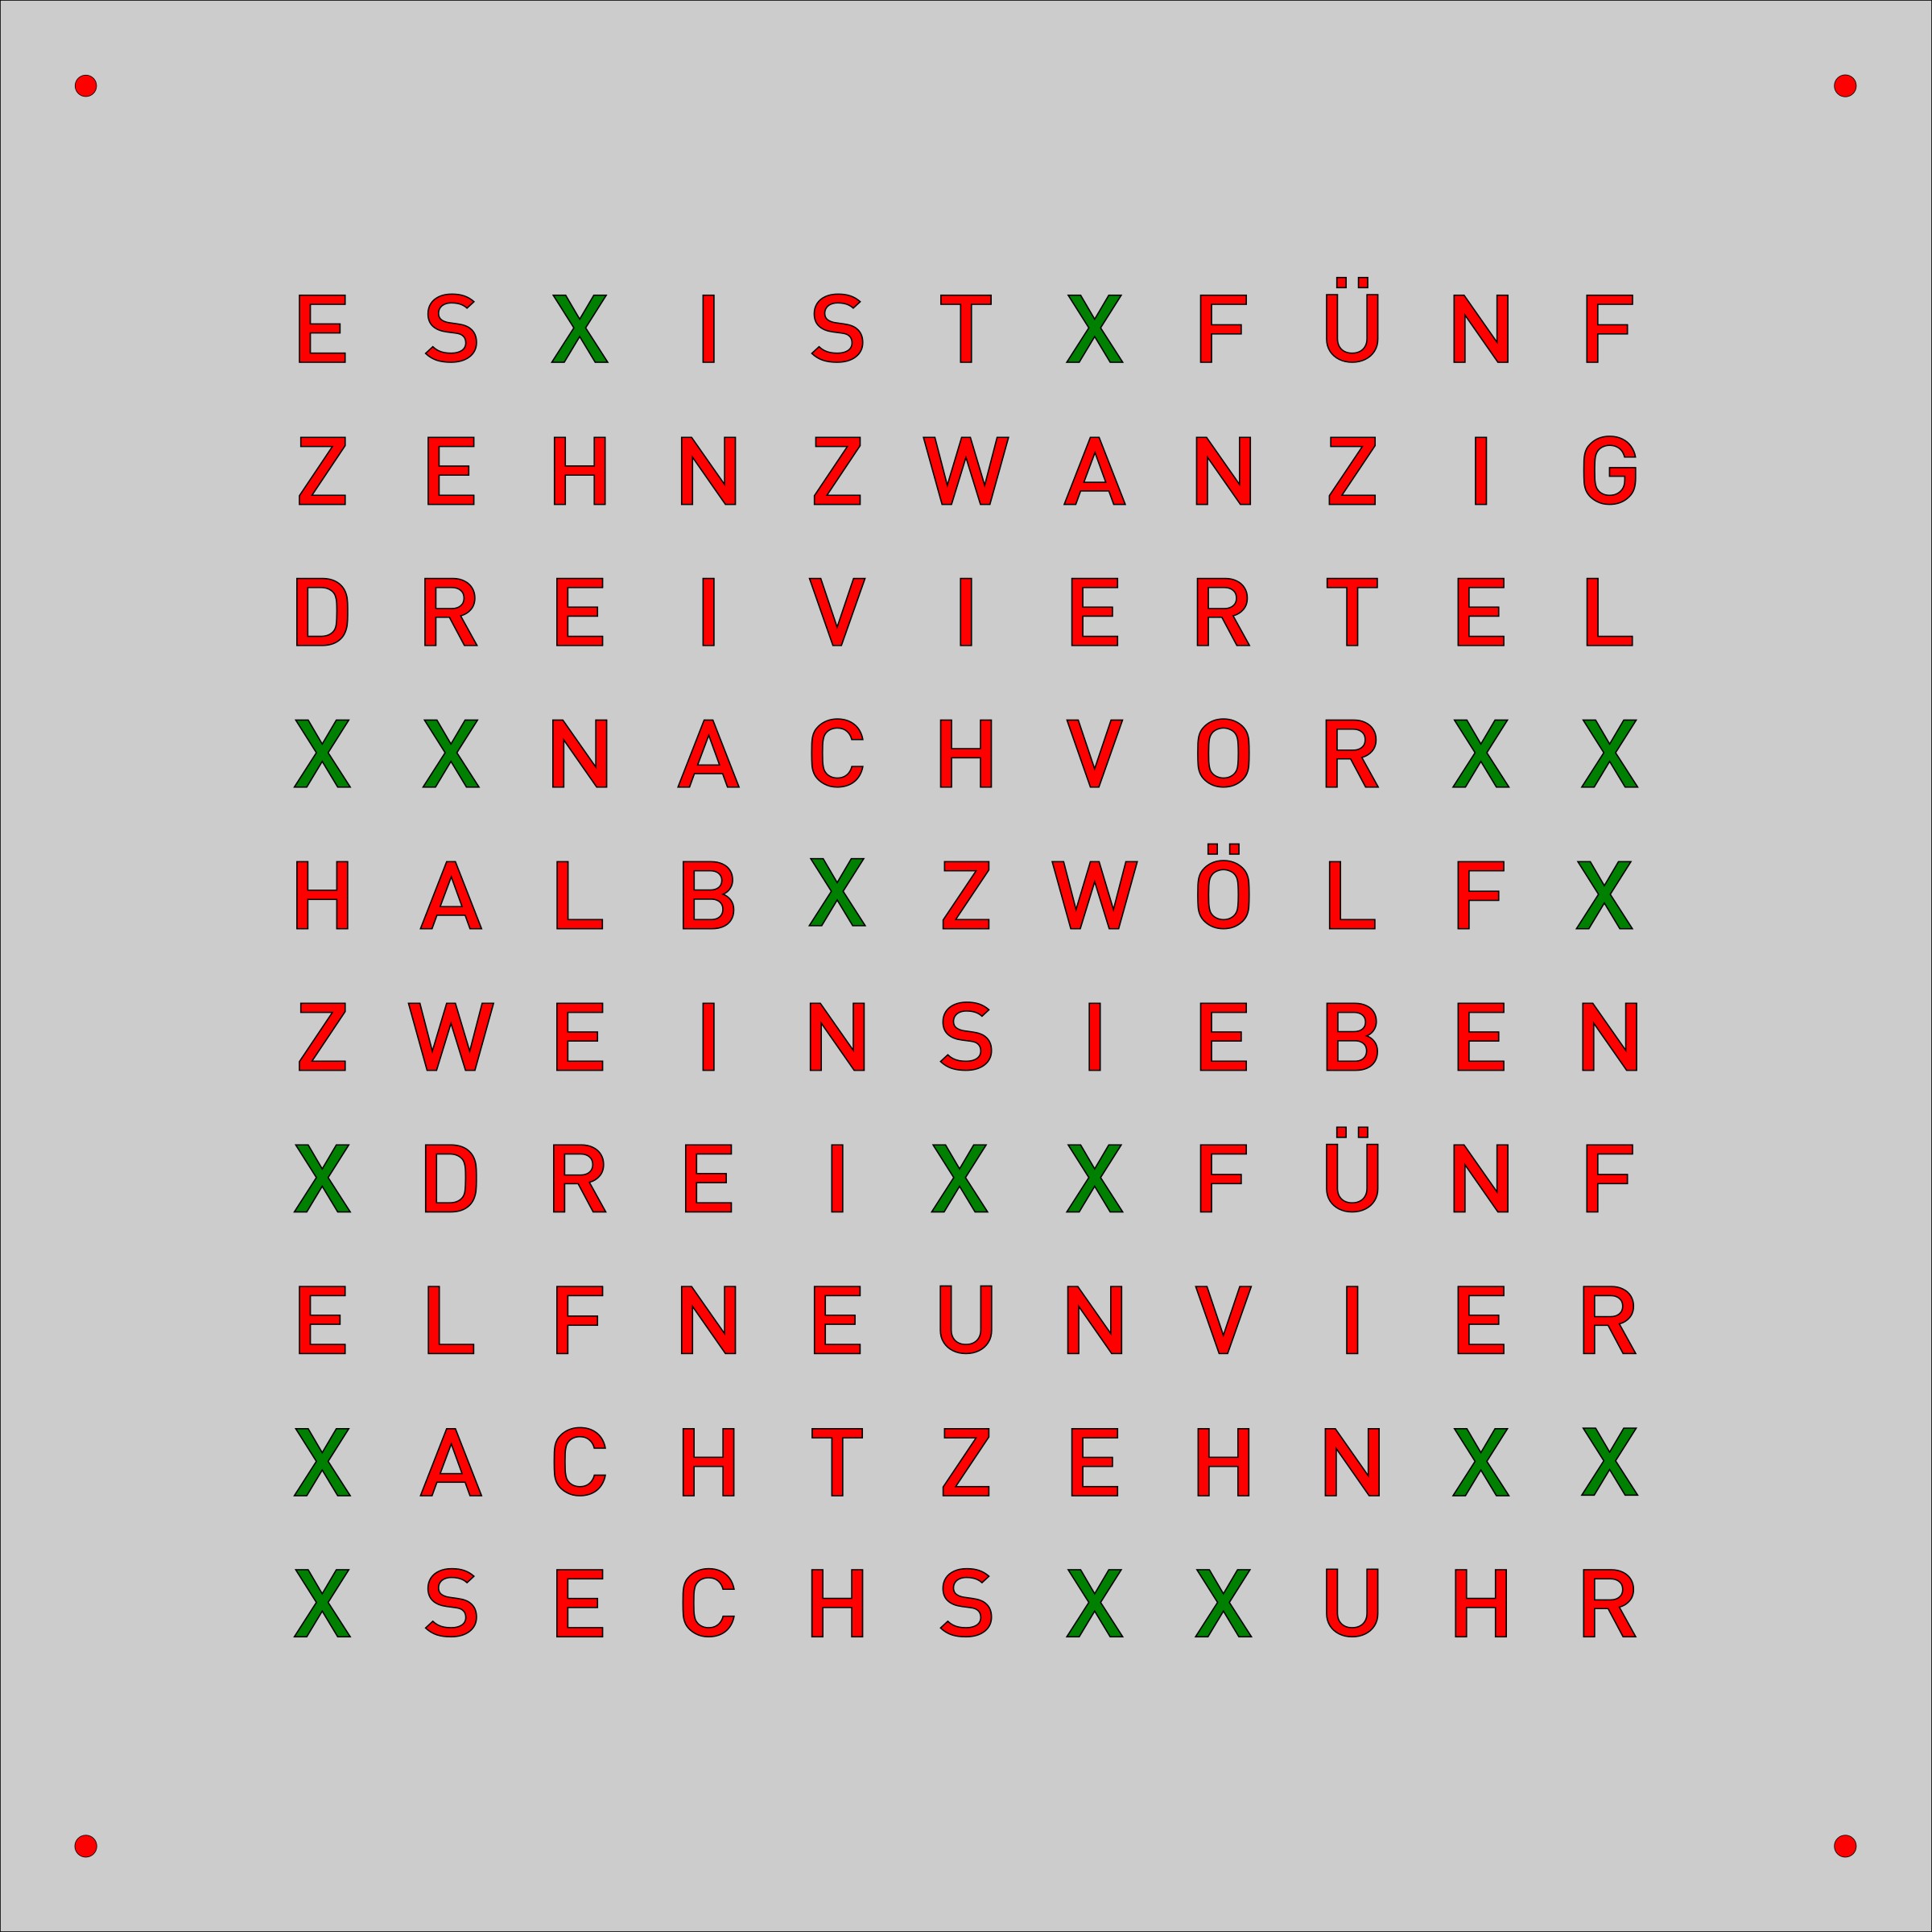
A possible letter placement on the front panel for the OpenWordClock. The red letters need to be positioned as shown and allow only for very little variation. The green “X” are filled with random letters.
The image above shows the rule set implemented in a front panel design. The red letters need to be positioned as shown. Obviously, there is a little variation possible (i.e. moving “nach” and “vor” to the left or right).
The green positions marked with “X” can be filled with random letters. Depending on your personal taste, you can also use images, emoticons or bananas for scale. Before heading to the plotter or laser, replace the “X” by letters of your choice.
Finally, to get the LEDs in the right positions, all letters need to be placed on a grid with 33 mm in the vertical direction (matching the pitch of the LED stripes). The pitch in the horizontal direction is 30 mm.
Diffusor materials
To get evenly lit letters, either through a foil stencil or through a laser cut front panel, OpenWordClock needs a suitable diffusor. While in the first approach, the diffusor is the front panel carrying material at the same time, only a thin diffusing layer is needed in the second approach.
Good results can be achieved with milky acrylic sheets. However, I found polystyrene to create an even better and homogeneous distribution of light. In addition, polystyrene is available either as 0.5 mm thick sheets or as 2 mm thick plates, so it can be used for either style of front panel.
The 0.5 mm thick sheets are usually available in an artists supply shop and can be cut to shape with scissors or a sharp knife. Here, no minimum size is required, but for laser cut front panels, the diffusor can consist of multiple pieces. Thicker polystyrene can be sourced in a hardware store, where it is common to order custom sizes as well. For foil front panels, the diffusor should be cut to 450 x 450 mm and be between 2 and 3 mm thick.
Foil on diffusor
The first approach consists in applying a foil stencil to a milky screen as front panel. This technique is particularly suited for custom printed front panels and glossy finishes without resorting to paint or lacquer. In contrast to the other approach, the foil on acrylic approach allows for full letters without any bridges or supports.

Foil on acrylic front panel.
Cut the front panel on a large scale foil plotter.
Consult your local fablab or makerspace. You may likely find a suitable foil plotter there. You need a plotting width of at least 500 mm.
Some plotters also support printing, so you can print your very personal OpenWordClock design.
carefully remove all letters from the stencil
Suitable tools for this task are a sharp exacto knife, fine tweezers and possibly a needle.
Be careful not to remove the internal parts of letters such as A, D, O, or R.
Apply transfer foil
Ask at your local fablab or makerspace, where you may find a suitable transfer foil.
Make sure to evenly apply pressure to have all parts attached.
Remove the protective layer and apply the stencil to the diffusor
When removing the protection layer, make sure all internal letter parts stay attached to the transfer foil.
When transferring the stencil over to the diffusor, use plenty of soap water, to be able to readjust the position. Then push the water out from the center to the edges to avoid bubbles.
Fold over the stencil edges over the diffusor to get clean edges.
Finally, remove the transfer foil. To see how to attach the magnets, keep reading at the bottom of this page.
Laser cut front panel
This second approach of a front panel is very suitable for front panels of wood, metal or other materials with a particular surface finish. The images below show a front panel from 3 mm teak plywood.

Diffusor on the back side of a front panel. |

Final assembled front panel. |
Take your stock material to your nearest cutting laser and cut out the stencil.
Make sure to choose the template with the bridges in letters like A, B, O, or R to avoid ugly holes.
Take your diffusor, measure and cut it into correctly sized pieces.
Glue the diffusor behind the letters, either with doubly sided tape or a universal purpose glue.
That’s it, done. For installing the mounting magnets, keep on reading below.
Attaching magnets for mounting
As a final step, it is time to install the mounting magnets on the front panel. There is a rather simple but powerful trick to achieve a good result.

OpenWordClock front panel magnet installation with plastic wrap around the corners. Glue not yet applied.
Take out the readily assembled body of your OpenwordClock and apply a strip of plastic wrap across the corner blocks with the countersunk magnets.
Take the magnets for the front panel and place them on the magnets in the corner blocks. The align perfectly on their own
If the countersink in the corner block is slightly too deep, place an additional magnet below the plastic wrap to raise the magnet for the front panel. You can remove it later.
Apply universal glue to all magnets.
Place and carefully align the front panel on top. Wait until the glue has cured.
Remove the plastic wrap and eventual additionally placed magnets. Reinstall the front panel.
Congratulations. Your OpenWordClock is now fully assembled.